
Picture this: you’re craving bold, café-level espresso at home, but all you’ve got is a little metal pot and a stovetop. Sounds familiar? You’re not alone—thousands of people try the moka pot once, end up with bitter sludge, and hide it in the back of a drawer, convinced it’s too tricky.
Here’s the thing—brewing great coffee with a moka pot isn’t about luck or barista-level skills. It’s about a handful of small, crucial tricks that make the difference between gritty regret and rich, warm satisfaction in your cup. If you’re missing these steps, you’ll keep getting that burnt, odd taste that just doesn’t hit the spot. That’s frustrating—and nobody deserves disappointing coffee at home.
By the end of this guide, you’ll master the moka pot guide how to use and finally make strong, delicious espresso-style coffee right on your stovetop. Grab your favorite mug and get ready—your morning ritual is about to get a serious upgrade.
Understanding How A Moka Pot Works
Ever wondered what’s really going on inside that classic moka pot bubbling away on your stove? Most folks think it’s just a quirky little espresso maker — but there’s more science than meets the eye. The moka pot’s genius lies in how it uses basic physics to create rich, concentrated coffee that hits the sweet spot between French press and espresso.
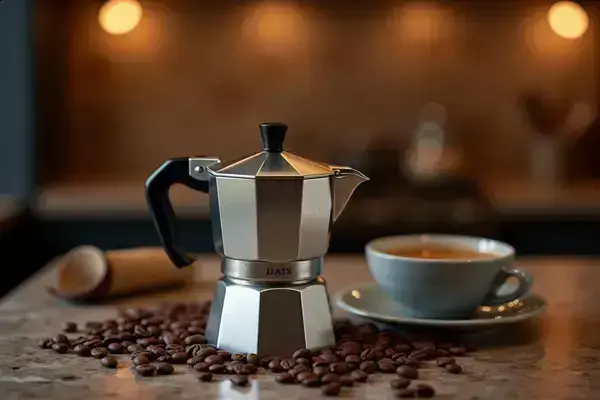
The moka pot is made up of three chambers: the bottom for water, the middle for finely ground coffee, and the top for the brewed magic itself. As you heat the pot, steam pressure forces hot water up through the coffee grounds. There’s no pump — just pressure, heat, and carefully designed metal. It’s all about transforming heat below into bold taste above.
💡 Pro Tip: Pre-heat your water before adding it to the base chamber. According to the Specialty Coffee Association, this reduces brew time and prevents the grounds from overheating, which leads to smoother flavor in every cup.
The Journey of Water and Coffee in a Moka Pot
Picture this scenario: It’s a cozy morning. You fill the base with fresh, preheated water, scoop your favorite finely ground beans into the filter, and screw everything together. As the pot heats, pressure builds — not too much, not too little — until water is pushed up through that packed bed of grounds, finally collecting in the top chamber as coffee. About 1.5 bars of pressure is typical, much less than the 9 bars of a commercial espresso machine, but perfect for moka’s signature strength.
| Component | Role | What to Watch For |
|---|---|---|
| Lower Chamber | Holds water for brewing | Avoid overfilling, always use the safety valve as a guide |
| Filter Basket | Holds ground coffee | Fill evenly, don’t tamp tightly—overpacking increases bitterness |
| Upper Chamber | Collects finished coffee | Remove from heat as soon as bubbling sounds fade |
According to Bialetti (the original moka pot maker), regular cleaning and proper assembly ensure consistent brewing and prevent safety issues. No need for fancy machines — but respecting the physics makes all the difference.
But there’s one detail most owners completely overlook until it’s too late…
Choosing The Right Coffee Grind And Beans
Why does your moka pot brew taste either too bitter or strangely weak? The truth is, the real secret isn’t in the pot — it’s the beans and grind you choose. Before you even fire up the stove, you’re making game-changing decisions with every scoop.
Not all coffee beans are created equal for moka pot brewing. You want a medium to dark roast for that punchy, robust profile. Lighter roasts tend to lose their nuance in the intense environment of a moka, so stick with blends labeled “espresso,” “moka,” or “Italian” roast. The flavor payoff is significant.
💡 Pro Tip: Always grind your coffee fresh — right before brewing. According to the National Coffee Association, pre-ground beans start losing their best flavors within 20 minutes of grinding. Invest in a simple burr grinder for more even extraction and fuller body in the cup.
- Beans: Opt for freshly roasted, whole beans sold within 30 days of roasting date for best results.
- Grind Size: Aim for a texture just a little coarser than espresso but finer than drip coffee — think sand, not powder nor pebbles.
- Origin: Single-origin beans from Brazil, Colombia, or Ethiopia deliver great complexity, while blends offer predictable balance and crema.
In practice:
You’re up early. Grinder humming. Beans from a local roaster, dark and glossy, cascade into the hopper. You pulse the burr grinder until the grounds resemble fine table salt. You scoop, fill the moka pot, and — wow. The resulting coffee tastes strong, smooth, and full-bodied, not burnt or gritty. That little swap from stale pre-ground to fresh grind changes everything.
| Type | Grind Texture | Pros & Cons |
|---|---|---|
| Pre-Ground | Fine, inconsistent | Convenient, but flavor fades fast |
| Freshly Ground | Fine, uniform | Best aroma and extraction, requires grinder |
| Espresso | Extra-fine | Too fine clogs moka filter, leads to bitterness |
Major industry leaders like Illy recommend experimenting with different origins and grinds — your water, pot, and even altitude can make a big difference. And this is exactly where most people make the most common mistake…
Step-By-Step Instructions For Brewing
How do you turn fresh grounds into a moka pot masterpiece—without any guesswork or burnt mishaps? Brewing strong, balanced espresso-style coffee on your stovetop is a precise dance, not just an art. Each detail matters, but with the right steps, you’ll nail it every single time.
Brewing Essentials
- Moka pot (all parts, clean and dry)
- Fresh coffee beans, ground medium-fine
- Kettle for pre-heating water
- Filtered water
- Stove with steady heat
- Damp towel (for rapid cooling, optional)
- Fill the base chamber with just-boiled water up to the safety valve level. Never cover the valve—this is critical for safe pressure release.
- Insert the filter basket and spoon in the ground coffee. Level off but don’t pack it down—too tight equals bitter, over-extracted coffee.
- Screw on the upper chamber using a towel or oven mitt if necessary. It’s hot, but this prevents pressure loss and ensures a tight seal.
- Place the moka pot on medium-low heat. Leave the lid open to monitor progress. If the brew spurts or gurgles too violently, the heat’s too high.
- Watch as the coffee fills the upper chamber. Once you hear a hissing or bubbling sound, remove the pot from the burner immediately.
- Wrap the base with a damp towel (optional) to halt extraction and avoid burnt flavors. Pour and enjoy right away for full aroma and crema.
⚠️ Important Warning: Never tamp the grounds as you would for espresso machines. The International Coffee Organization highlights that over-packing can lead to dangerous pressure build-up and potential burns—safety first, always.
In practice: Imagine you’re rushing through your morning routine. You assemble, set it on the flame, and—thanks to a tiny detail like hot water in the base—the coffee climbs smoothly, filling your kitchen with that signature moka aroma. No sputters, just a steady stream of rich brew. It’s a small ritual, but once you nail this flow, the moka pot quickly becomes your daily coffee hero.
But there’s a trick with troubleshooting that most baristas NEVER tell you…
Troubleshooting Common Moka Pot Issues
Why does your moka pot sometimes hiss, sputter, or leave you with weak, burnt, or leaky coffee? Even the simplest stovetop devices have their quirks. The good news? Most issues come from a few easy-to-fix missteps — often overlooked in the rush to that first sip.
- Weak coffee: Your grind is too coarse, the coffee is under-dosed, or the heat is too low. Double-check the amount — fill the filter basket fully — and try a finer grind for more extraction.
- Bitter, burnt taste: Excessive heat or stale coffee beans are usually to blame. Use just-boiled water in the base, keep the flame gentle, and choose fresh beans whenever possible.
- Water leaks: Worn-out gaskets or loose assembly. The International Coffee Organization recommends inspecting silicone or rubber seals every few months and replacing if cracked or misshapen. Clean all threads and make sure everything is tightly screwed together.
💡 Pro Tip: If your moka pot sputters and sprays coffee, it’s likely overpacked or ground too fine. Ease up on tamping and test a slightly coarser grind for a smoother, more consistent brew.
In practice:
Picture this scenario: you’re half-awake, eager for that first cup, but—uh oh—nothing’s coming out. Frustrating, right? You check the chamber. Grounds too fine, packed down tightly. With a quick fix —looser fill, slightly coarser grind—suddenly, the pot works like a charm, and you’re sipping stress-free. That little tweak often transforms the whole routine.
| Problem | Likely Cause | Quick Fix |
|---|---|---|
| No brew | Clogged filter, too fine grind | Clean basket, adjust grind size |
| Gurgling noise | Overfilled base, too much heat | Use less water, lower the flame |
| Leaking | Worn gasket, loose seal | Replace gasket, tighten pot |
Many moka pot fans follow guidelines from the Specialty Coffee Association, who recommend regular care and mindful technique over chasing perfection. What actually works might surprise you…
Cleaning And Maintaining Your Moka Pot
Ever notice your moka pot brew losing its rich flavor over time? That’s not your imagination—it’s almost always a cleaning or maintenance issue. Here’s the thing: daily residue, hard water buildup, and worn parts can quietly sabotage everything you love about that stovetop ritual. Good news: with the right habits, your moka pot will reward you for years.
- Disassemble Immediately: After brewing, let the pot cool for a few minutes. Separate all parts—chambers, filter basket, gasket—so nothing sticks or warps.
- Rinse, Don’t Soap: According to Bialetti, never use soap or detergent. Hot water is enough to remove coffee oils, and a gentle brush clears stubborn grounds without harming the aluminum or steel.
- Dry Completely: Air dry upside down on a rack. Leftover moisture—even a few drops—can create stale flavors and cause gaskets to deteriorate faster.
- Check the Gasket and Valve: Inspect silicone or rubber seals and the safety valve monthly. Replace worn or brittle gaskets and clear any valve debris for consistent brewing pressure.
- Deep Clean Monthly: For hard water or stuck oils, soak the parts in a 1:1 mix of vinegar and water for thirty minutes, then rinse and dry thoroughly.
💡 Pro Tip: Never put your moka pot in the dishwasher. The Specialty Coffee Association emphasizes that harsh detergents and hot drying cycles wear out metal finishes and seals much faster—handwash only for true longevity.
Picture this scenario:
It’s Sunday morning. You brew a perfect pot, then—before sitting down—quickly rinse, dry, and double-check the gasket. No lingering residue, no frustration next time. It’s a minute well spent. Over weeks, the difference is clear: less bitterness, richer crema, and the whole process just feels… easier.
| Item | Frequency | Why It Matters |
|---|---|---|
| Rinse all parts | After each use | Prevents oil and flavor buildup |
| Inspect gasket | Monthly | Avoids leaks/pressure loss |
| Deep clean with vinegar | Monthly | Removes mineral scaling |
Once this is in place, the rest of the routine falls into place naturally.
Your Best Moka Moments Start Now
If you take just one thing from this moka pot guide how to use, let it be: paying attention to the details—from grind size to cleaning—makes all the difference. Choosing fresh beans and using the right steps brings real, bold flavor to your cup. Knowing how to solve common issues saves a ton of frustration and disappointment.
Before reading this, making strong, smooth moka coffee on your stovetop might have felt hit-or-miss—sometimes decent, sometimes a mess. Now? You’ve got confidence. You know the little moves that turn those basic ingredients into something rich and special. Brew time’s no longer guesswork—it’s your morning ritual done right.
Which moka pot tip will you try first for your next brew? Tell us in the comments—let’s make every cup better together!

Ethan Cole Hargrove is a pour over coffee enthusiast, specialty coffee writer, and the founder of this blog — built for anyone who has ever tasted a truly great cup of coffee and wanted to understand exactly how to make it at home.
Ethan’s coffee journey started the way most do — with a supermarket blend and a cheap drip machine. Then one morning at a specialty café, a barista handed him a pour over and everything changed. The clarity, the complexity, the way the same bean could taste completely different depending on how you brewed it. He was hooked.
What followed was years of testing every dripper, grinder, kettle, and filter he could get his hands on. Comparing Chemex vs V60 vs Kalita. Dialing in grind size by the click. Learning why water temperature matters more than most people think. Building a morning ritual around a process that is as meditative as it is delicious.
Ethan is not a Q Grader, certified barista, or