You’ve probably stood there, kettle in hand, watching bubbles rise on fresh coffee grounds—and maybe wondered what’s really happening. Have you ever noticed that sometimes the result is vibrant and aromatic, while other times your pour over tastes dull no matter what beans you use? That moment, called the bloom, isn’t just for show—it’s a vital step that can make or break your cup.
Here’s the thing: skip blooming, and you risk locking in bitterness, flatness, and that sad “good enough” mug. Ignoring this quick step costs you complexity and sweetness—like buying the good beans and never tasting their full potential. For many, it’s the missing link between average and truly great coffee at home.
By the end, you’ll know exactly how to master the coffee bloom guide pour over, banish those flat results, and finally get the clarity and vibrancy your beans promise. Stick around—the secrets to bigger coffee flavor are just ahead.
Understanding Coffee Bloom And Why It Happens
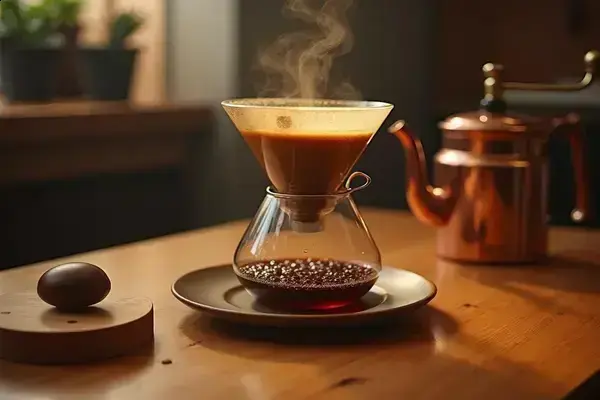
Ever wondered why freshly ground coffee often fizzes and bubbles up when you begin pouring? That’s not just hot water showing off—it’s called the coffee bloom, and it’s the sign of a living, breathing coffee packed with potential flavor. The bloom is the rapid release of carbon dioxide (CO₂) gases trapped inside roasted coffee grounds. When hot water first hits those grounds, CO₂ escapes quickly, creating a foamy bloom at the surface.
But why does this happen in the first place? Here’s the thing: during roasting, coffee beans fill up with CO₂, a byproduct of the Maillard reaction (the very process that also gives roasted beans their complex aroma and deep color). If you brew right away, all that trapped gas can produce uneven extraction—leading to unpredictable, sometimes sour or flat taste. The bloom stage lets these gases escape before real brewing begins, paving the way for a more controlled, flavorful extraction.
💡 Pro Tip: According to the Specialty Coffee Association, blooming is especially important for freshly roasted coffee—skip this step and you’ll risk muddy flavors and wasted nuance from your premium beans.
The Science Behind the Bloom
Picture this scenario: you grab a bag of single-origin beans roasted just two days ago. The first time you skip the bloom and pour straight through, the cup tastes sour and oddly sharp. The next morning, you pause for a 30-second bloom—suddenly your mug is sweet, balanced, and bright. It’s not magic. It’s chemistry at work in your kitchen.
| Key Element | Role in Bloom | Impact on Taste |
|---|---|---|
| CO₂ Gas | Escapes during bloom | Prevents sourness, improves clarity |
| Freshness of Roast | More gas present in fresh beans | Bigger, more active bloom |
| Water Temperature | Affects speed of gas release | Consistent flavor extraction |
So, the next time those bubbles foam up, remember: it’s not just eye candy—it’s the start of unlocking every note your coffee can offer. But here’s what most coffee lovers get wrong when it comes to blooming…
Common Mistakes People Make When Blooming Coffee
Think blooming coffee is all about pouring a splash of water and waiting? The truth is, even experienced home brewers often stumble over the same pitfalls—turning promising beans into disappointing cups. It’s surprisingly easy to miss small details that completely change your pour over experience.
- Using Water That’s Too Hot or Too Cool: Too-hot water (above 205°F) can scorch grounds, while water that’s not hot enough (under 195°F) won’t draw out flavor or gas properly.
- Poorly Distributed Water: If you dump water in one spot, some grounds never get wet—leaving pockets that release CO₂ unevenly, resulting in weak extraction and off flavors.
- Insufficient Bloom Time: Cutting the bloom short—less than 30 seconds—means trapped gases stay behind, leading to sour, unevenly extracted coffee.
- Not Using Freshly Roasted Beans: Beans that are stale or pre-ground have little CO₂ left to bloom, killing your chances for that lively interaction.
- Wrong Coffee-to-Water Ratio: Adding too much or too little water changes how the bloom forms, and throws off the whole brew.
💡 Pro Tip: According to the National Coffee Association, always pour about twice the weight of your coffee grounds in water during the bloom (for 20g coffee, use roughly 40g water). This ensures even saturation and better degassing.
In practice: you might pour water, wait 10 seconds, and assume your batch bloomed. But then you taste your coffee—flat and harsh, not aromatic at all. Turns out, those shortcuts matter.
| Mistake | Effect on Brew | How to Fix |
|---|---|---|
| Water too hot | Bitterness, burnt aroma | Keep water 195–205°F |
| Poor water pour | Channeling, weak flavor | Pour gently, swirl if needed |
| Short bloom time | Sour, muddled taste | Wait at least 30–45 seconds |
Most home enthusiasts feel a world of difference with just a tiny tweak—like dialing in that water temperature or pausing just a bit longer. But there’s one detail most people completely overlook until it’s too late…
Step-By-Step Guide To Blooming For Pour Over
Ever wonder, “Am I actually blooming my coffee the right way?” It’s a real question—because that simple step is what separates bland, flat brews from cups that make you pause after the first sip. The good news is, anyone can master it. You just need the right process and timing.
- Fresh coffee beans (whole, ideally roasted within 2 weeks)
- Burr grinder (for even grounds)
- Kitchen scale (grams accuracy)
- Gooseneck kettle (for control)
- Filtered water (195–205°F)
- Pour over dripper and filters
- Weigh and grind your beans: Start with 20 grams of fresh coffee. Grind to medium (think kosher salt). Consistency prevents channeling, making the bloom uniform.
- Set up your brewer: Place the filter in the dripper, rinse with hot water, and discard rinse water. Add the grounds and level them with a gentle shake.
- Pre-infuse with precision: Zero your scale, then gently pour 40 grams of hot water (about twice the weight of the grounds) in slow circles to saturate all the coffee. Cover every bit.
- Pause and wait: Let the coffee bloom for 30–45 seconds. Watch bubbles rise—CO₂ escapes now, prepping your grounds for extraction.
- Continue your pour: Resume pouring the rest of the water in controlled spirals to complete your brew as usual. This aids even extraction and balanced flavor.
💡 Pro Tip: For ultra-fresh beans, extend your bloom time up to 60 seconds—guidelines from the Specialty Coffee Association show this releases more trapped gas, making a clearer cup.
In practice: imagine waking up early, implementing every step, and smelling a bright, sweet aroma that actually fills your kitchen. You’ll know instantly that you nailed it—no guesswork. What actually works might surprise you…
How Coffee Bloom Impacts Flavor And Aroma
Why does that fizzing bloom phase transform a cup of coffee from average to extraordinary? It’s simple: those few seconds set the stage for the extraction of every nuanced note locked inside your beans. Think of the bloom as a pressure release valve; if you ignore it, you’re sipping on trapped gases instead of true flavor.
Here’s the thing—CO₂ is the culprit in muddy, sour, or “off” flavors. As it rapidly escapes during the bloom, it prevents water from channeling around gas pockets and missing sections of the grounds. That means all your carefully chosen single-origin beans actually get a fair shot at releasing their sweetness, florals, or deep chocolate notes.
💡 Pro Tip: According to the Coffee Science Foundation, letting coffee bloom for 30–45 seconds noticeably heightens aroma intensity and flavor clarity. Rushing the bloom, especially with light roasts, produces dull, sometimes cardboard-like taste and a muted aroma.
In practice: picture this scenario—a home barista skips the bloom completely. Their pour over smells bland, more like soggy bread than fresh coffee. But after a proper bloom, even using the same beans, the kitchen is suddenly filled with lively scent: citrus, cocoa, toasted nuts—actual café vibes at home.
| Bloom Quality | Resulting Flavor | Aroma |
|---|---|---|
| Proper, even bloom | Sweet, balanced, distinct notes | Intense, layered (floral, citrus, nutty, etc.) |
| Rushed bloom | Flat, sour, muddled | Weak, muted |
| No bloom | Bitter, off flavors, under-extracted | Dull, stale, sometimes “wet cardboard” |
And honestly? Most people are shocked how big the difference is. But influencing flavor is just one piece—troubleshooting a poor bloom takes things even further…
Troubleshooting Poor Coffee Bloom Results
Ever poured water over your coffee and watched the bloom fall flat—or barely bubble at all? You’re not alone. Troubleshooting a sad coffee bloom means looking at a few key culprits: beans, technique, and equipment. Let’s break it down with real fixes that work in your own kitchen.
- Stale or Pre-Ground Beans: If your bloom is weak or nonexistent, your beans may have lost most of their CO₂. Coffee roasted more than three weeks ago or pre-ground loses gases fast.
- Wrong Water Temperature: Coffee needs water between 195°F and 205°F to trigger blooming. Too cool? Minimal fizz. Too hot? You risk bitter flavors, not bloom.
- Inconsistent Grinding: If grounds are uneven, some parts extract too quickly while others lag behind—messing up degassing and taste.
- Insufficient Water Ratio: Not using at least double the grounds’ weight in water during bloom leads to patchy wetness and poor CO₂ release.
⚠️ Important Warning: According to the Specialty Coffee Association, always check your equipment: a clogged dripper or old filter can block water flow, sabotaging even the best technique. Clean gear helps your bloom reach its full potential.
Picture this scenario: a home brewer grabs beans from the back of the pantry—last month’s leftovers. Their bloom lies flat, barely a bubble in sight. The next day, they try a new bag roasted only days ago. Suddenly: rapid bubbling, more aroma, a radically better cup. Beans matter.
| Problem | Diagnostic Sign | Solution |
|---|---|---|
| Stale coffee | No bloom, muddy taste | Buy fresh-roasted, whole bean |
| Low water temp | Barely any bubbling | Use thermometer, heat to 200°F |
| Uneven wetting | Pockets of dry grounds | Pour in slow, circular motion |
Dialing in each variable pays off—your coffee’s bloom is usually a snapshot of your ingredients and care. The right habits in place now make everything easier from here.
Your Best Coffee Is Brewing
If you take just one thing from this coffee bloom guide pour over, let it be: blooming is the small step with the biggest impact—unlocking fresher flavor, better aroma, and consistent results every time. Learn why gas release matters, master each pour, and troubleshoot with confidence. It’s all in your hands now.
Before reading this, a flat or bitter pour over might have just felt like bad luck. Now, you know the real reasons behind it—and how to fix them. You’ll notice the difference in every cup: higher clarity, wider aroma, and a routine that actually feels rewarding. Trust yourself—you’re more skilled than you think.
What’s your go-to tweak for a better bloom, or do you have a coffee question that’s still bugging you? Share it in the comments below—I’d love to hear your pour over wins or struggles!

Ethan Cole Hargrove is a pour over coffee enthusiast, specialty coffee writer, and the founder of this blog — built for anyone who has ever tasted a truly great cup of coffee and wanted to understand exactly how to make it at home.
Ethan’s coffee journey started the way most do — with a supermarket blend and a cheap drip machine. Then one morning at a specialty café, a barista handed him a pour over and everything changed. The clarity, the complexity, the way the same bean could taste completely different depending on how you brewed it. He was hooked.
What followed was years of testing every dripper, grinder, kettle, and filter he could get his hands on. Comparing Chemex vs V60 vs Kalita. Dialing in grind size by the click. Learning why water temperature matters more than most people think. Building a morning ritual around a process that is as meditative as it is delicious.
Ethan is not a Q Grader, certified barista, or